
How to Use Speech Recognition in Google Docs: A Step-by-Step Guide
Speech recognition technology has revolutionized the way we interact with our devices, making tasks like writing and editing documents faster and more efficient. Google Docs offers a powerful built-in speech recognition tool that can help you draft documents, take notes, and much more—all without typing a single word. Follow these steps to get started with speech recognition in Google Docs.
1. Open Google Docs
Begin by opening Google Docs in your preferred web browser. Navigate to Google Docs, and sign in with your Google account if you aren't already logged in. You can create a new document by clicking on the "+" icon or open an existing document from your list.
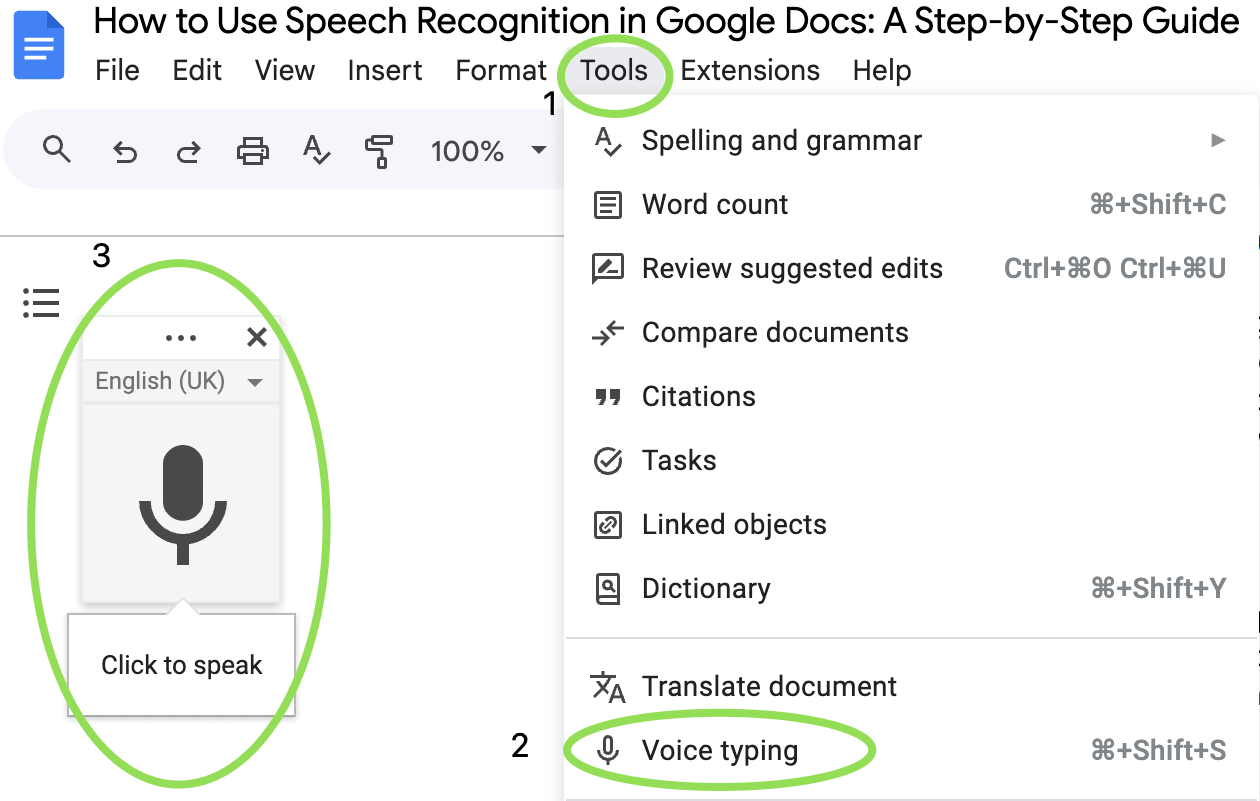
2. Access the Voice Typing Feature
Once you have your document open, go to the menu bar at the top of the screen. Click on "Tools," and from the drop-down menu, select "Voice typing…" A microphone icon will appear on the left side of your document, signaling that you’re ready to start dictating.
3. Set Up Your Microphone
Before you start dictating, ensure that your microphone is properly set up and functioning. Google Docs will prompt you to grant permission to access your microphone if you haven’t done so already. Click "Allow" when prompted to ensure that the voice typing feature works correctly.
4. Start Dictating
Click the microphone icon to activate the voice typing feature. You’ll notice that the icon changes color to indicate that it’s listening. Begin speaking clearly into your microphone, and your words will start appearing in the document as text. Speak naturally, and try to articulate your words clearly for the best results.
5. Use Voice Commands for Punctuation and Formatting
To make your document more readable, you can use voice commands for punctuation and formatting. For example, say "period" to insert a period, "comma" for a comma, or "new line" to start a new line. You can also say "bold" to make text bold or "italic" for italics.
6. Edit and Review Your Document
After dictating, review your document to make any necessary edits. Voice recognition is not perfect, so be prepared to make corrections or adjustments as needed. You can also use Google Docs’ built-in tools to further format and refine your document.
7. Save and Share Your Document
Once you’re satisfied with your work, save your document by clicking on "File" and selecting "Save." You can also share your document by clicking the "Share" button in the top right corner and entering the email addresses of your collaborators.
FAQ
1. What languages does Google Docs support for voice typing?
Google Docs supports a variety of languages and dialects. You can change the language by clicking on the drop-down menu next to the microphone icon and selecting your preferred language.
2. Do I need any special software to use voice typing in Google Docs?
No special software is required. All you need is a compatible web browser and a working microphone. Google Docs’ voice typing feature is built into the application.
3. How accurate is the voice recognition in Google Docs?
Voice recognition accuracy can vary based on your speech clarity, accent, and background noise. For the best results, speak clearly and ensure you’re in a quiet environment.
4. Can I use voice typing on mobile devices?
As of now, the voice typing feature is available primarily on desktop versions of Google Docs through the Chrome browser. However, you can use the Google Docs mobile app’s voice-to-text feature as an alternative.
5. What should I do if the microphone icon doesn’t appear?
Ensure that you have granted Google Docs permission to access your microphone and that your microphone is functioning properly. Refresh the page or restart your browser if the issue persists.