
Borders for Google Docs: A Simple Guide
Adding borders to your Google Docs can make your document look more professional and visually appealing. Whether you need to highlight a particular section, create a flyer, or enhance a report's layout, borders can add structure and clarity. This guide will show you step-by-step how to add borders to your Google Docs to suit your needs.
How to Add Borders in Google Docs
Step 1: Open Your Document Start by opening your Google Docs file. You can create a new document or open an existing one that you want to edit.
Step 2: Choose the Border Location There are several ways to add borders in Google Docs depending on whether you want a border around the entire page, a single paragraph, or an image. Below, we cover different methods for each.
Adding a Border to an Entire Page
To enhance your understanding of borders, check out this guide onhow to put a border on Word in Google Docs.
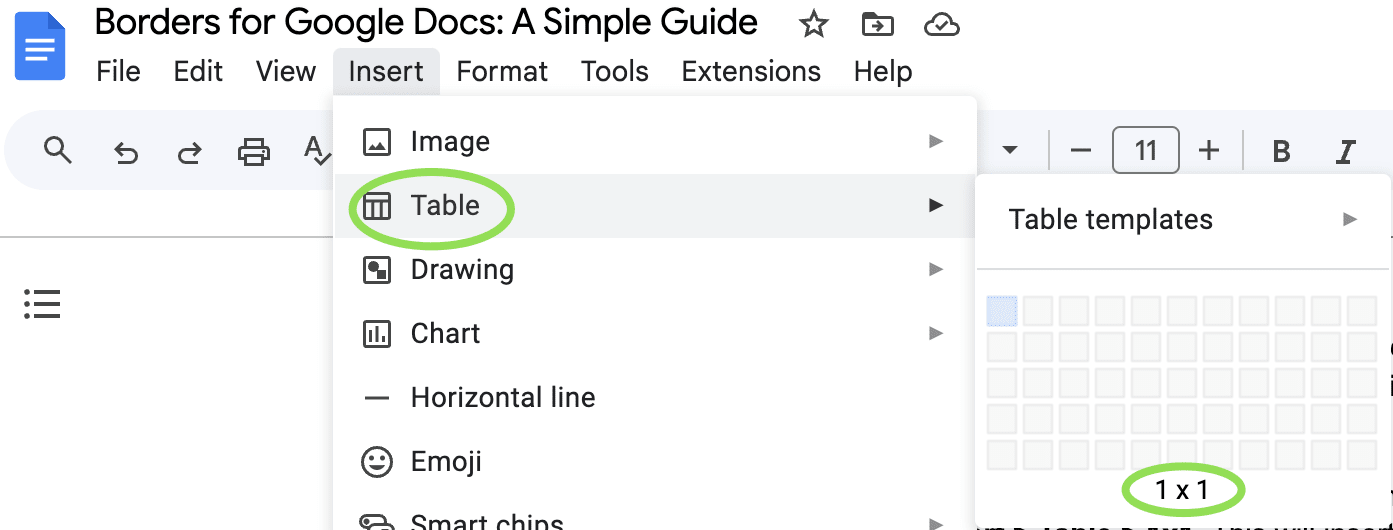
Step 3: Use a Table Unfortunately, Google Docs does not have a direct option for adding a page-wide border. However, you can work around this limitation by using a 1x1 table to create a border around your page.
- Place your cursor at the top of your document.
- Go to Insert > Table > 1x1 . This will insert a single-cell table.
- Drag the table’s edges to cover the entire page. You can adjust its size by dragging the corners.
- Click on the table and go to the toolbar. Click on the Border color icon to choose your border's color.
- Next to it, click on the Border width icon to select the thickness of the border.
Now, you have a border around your entire page!
Adding a Border to a Paragraph
Step 4: Use Paragraph Borders and Shading To add a border to a specific paragraph:
- Select the paragraph or text you want to add a border to.
- Go to Format > Paragraph styles > Borders and shading .
- In the window that appears, you can customize the border by selecting its position (top, bottom, left, right), color, and width.
- Once you're satisfied with the settings, click Apply .

Adding Borders to Images
Step 5: Customize Image Borders If you want to add a border around an image:
- Select the image.
- Go to the toolbar above and click on the Border color icon to pick a color.
- To adjust the border's thickness, use the Border weight option next to the color icon.
This feature is especially useful when you're using images in reports, presentations, or flyers and want them to stand out.
Step 6: Review and Adjust Once you’ve added your borders, take a moment to review the overall look. Make sure the borders don’t interfere with your document's readability. You can always go back and adjust the border size, color, or placement to achieve the desired effect.
FAQs about Borders in Google Docs
1. Can I add a decorative border in Google Docs? Currently, Google Docs doesn't offer built-in decorative borders. However, you can insert images or use online tools to create custom borders and then add them to your document as images.
2. How do I remove a border in Google Docs? To remove a border, click on the table, paragraph, or image with the border. For tables, go to the border icon and select No Border . For paragraph borders, go to Format > Paragraph styles > Borders and shading , and set the border width to 0pt. For images, select the image and click on Border color , then choose the Transparent option.
3. Can I change the border style? Google Docs offers limited customization for border styles. You can change the color and thickness of borders, but dotted or dashed border styles are not available.
4. Why can’t I add a border to the entire page directly? Google Docs lacks a native page border feature. The workaround using a table is the most common way to create a border around the entire page.
5. Will borders affect my document’s printing layout? Yes, borders will appear in the printed version of your document. It’s always a good idea to use Print Preview to ensure the borders look as expected before printing.